Basics
Arduino IDE
- Install Arduino IDE
Tools>Manage Libaries- ESP8266/Node MCU
-
Preferences> Additional boards manager URLS-
https://arduino.esp8266.com/stable/package_esp8266com_index.json
-
Tools>Board>Boards Manager> SearchESP8266>Install -
Ensure
CH340g Driverinstalled Tools>Board> Select BoardTools>Board> Connect to Port- Compile & Upload
-
Simulators
- Wokwi (Open-Source)
- TinkerCad
Code
Skeleton
Input/Outputs
| Function | |||
|---|---|---|---|
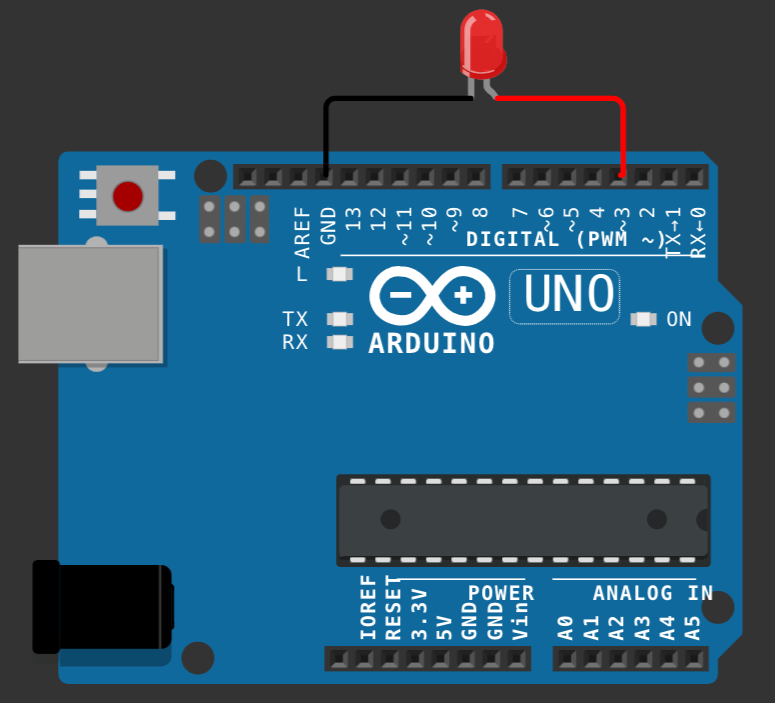
| Configuring | A GPIO pin cannot be used for both input and output. You need to specify one. | pinMode(<pin_number>, <i/o>); | pinMode(3, INPUT);pinMode(3, OUTPUT); |
| Outputs | Digital | digitalWrite(<pin_number>, <state>); | digitalWrite(3, HIGH); // or digitalWrite(3, 1);digitalWrite(3, LOW); // or digitalWrite(3, 0); |
| Analog | analogWrite(<pin_number>, value); | analogWrite(3, 25); |
// Code for blinking LED

void setup(){
  pinMode(3, OUTPUT);
}
void loop(){
  digitalWrite(3, HIGH);
  delay(1000); // 1000ms

  digitalWrite(3, LOW);
  delay(1000); // 1000ms
}
// Code for changing LED brightness

void setup(){
  pinMode(3, OUTPUT);
}
void loop(){
  for (int i=0; i<=1023; i++) {
    analogWrite(3, i);
    delay(1000); // 1000ms
  }
}
Serial Monitor
Baudrate \(\equiv\) Bitrate
- Bitrate is for binary
- Baudrate is for analog signal
Serial.begin(9600); // ; baudrate // initializes serial monitor

Serial.read() // return ASCII values
int reading_int;
char reading_char;

void setup(){
  Serial.begin(9600);
}
void loop(){
  while (Serial.available()){
    reading_int = Serial.read();
    reading_char = reading_int;

    Serial.println(reading_int);
    Serial.println(reading_char);
  }
  delay(500);
}
Unique ID for Arduino
Method 1: Automatic (using external library)
#include <ArduinoUniqueID.h> // in the same folder of this note

for(size_t i = 0; i < UniqueIDsize; i++)
  Serial.println(UniqueID[i], HEX);
Method 2: Automatic
#include <stdio.h>
#include <stdlib.h>
#include <unistd.h>
#include <sys/fcntl.h>
int main(int ac, char **av) {
    int fd, i;
    unsigned char eui[8];
    fd = open("/dev/random", O_RDONLY);
    if (fd < 0) {
        perror("can't open /dev/random");
        exit(1);
    }
    if (read(fd, eui, sizeof(eui)) != sizeof(eui)) {
        fprintf(stderr, "couldn't read %zu bytes\n", sizeof(eui));
        exit(1);
    }
    eui[0] = (eui[0] & ~1) | 2;
    for (i = 0; i < sizeof(eui); ++i) {
        printf("%02X%c", eui[i], i == sizeof(eui)-1 ? '\n' : '-');
    }
    return 0;
}
Method 3: Manual/Custom ID
Get the code from TOOLS > Get Board Info or put a custom one
write_id_to_eeprom.ino
char sID[7] = "AE0001";

// do this only once on an Arduino,
// write the Serial of the Arduino in the first 6 bytes of the EEPROM

#include <EEPROM.h>

void setup()
{
  Serial.begin(9600);
  for (int i=0; i<6; i++) {
    EEPROM.write(i,sID[i]);
  }
}

void loop() {
  //
}
read_id_from_eeprom.ino // reads the Serial of the Arduino from the
// first 6 bytes of the EEPROM
#include <EEPROM.h>
char sID[7];
void setup()
{
Serial.begin(9600);
for (int i=0; i<6; i++) {
sID[i] = EEPROM.read(i);
}
Serial.println(sID);
}
void loop() {
//
}
Multi-Tasking
Interrupts
| Trigger | Meaning in Bits |
|---|---|
| High | 1 |
| Low | 0 |
| Rising | 0-1 |
| Falling | 1-0 |
| Change | 0-1 or 1-0 |
void my_func() {
  delay_seconds = 1;
  delayMicroseconds(delay_seconds * 1000 * 1000);

  if (digitalRead(buttonPin) == LOW)
  {
    return ;
  }

  led_state = !led_state;
  digitalWrite(ledPin, ledState);
}

void setup(){
  pinMode(buttonPin, INPUT);
  pinMode(ledPin, OUTPUT);

  attachInterrupt(buttonPin, my_func, RISING);
}

void loop() {
  while(WiFi.connected()){

  }
}
millis() instead of delay()
Arduino does not support multi-threading/processing, and hence parallel processing is not possible
unsigned long prevTime = millis();
unsigned long currentTime;

void setup() {

}

void loop() {
  currentTime = millis();

  if (currentTime - prevTime > 1000) {
    doSomething();

    prevTime = currentTime;
  }
}
Example
#define LED1 13
#define LED2 12
#define LED3 11

#define BTN 4

// set LED states
int LED1_state = LOW;
int brightness = 0;

// previous time for the tasks depending upon time.
unsigned long prevTime_T1 = millis();
unsigned long prevTime_T4 = millis();

// time intervals for the tasks
long interval_T1 = 1000; // blink every 1 second
long interval_T4 = 5000; // print brightness of LED3 every 5 seconds

void setup() {
  // put your setup code here, to run once:
  Serial.begin(9600);
  pinMode(LED1, OUTPUT);
  pinMode(LED2, OUTPUT);
  pinMode(LED3, OUTPUT);
  pinMode(BTN, INPUT_PULLUP);
}

void loop() {
  // put your main code here, to run repeatedly:
  unsigned long currentTime = millis();

  // Task 1 : Blink LED1 (T1)
  if (currentTime - prevTime_T1 > interval_T1) {
    LED1_state = !LED1_state;
    digitalWrite(LED1, LED1_state);

    prevTime_T1 = currentTime;
  }

  // Task 2 : Glow LED2 when BTN is pressed
  if (digitalRead(BTN)) {
    digitalWrite(LED2, LOW);
  } else {
    digitalWrite(LED2, HIGH);
  }

  // Task 3 : Read input from serial monitor (0-255) and then write to LED3
  if (Serial.available()) {
    brightness = Serial.parseInt();
    if (brightness >=0 && brightness <= 255) {
      analogWrite(LED3, brightness);
    }
  }

  // Task 4 : print the brightness of LED3 in the serial monitor after every 5 seconds
  if (currentTime - prevTime_T4 > interval_T4) {
    Serial.print("Brightness (0-255): ");
    Serial.println(brightness);

    prevTime_T4 = currentTime;
  }
}